Showing posts with label Jacket a Month. Show all posts

Saturday, December 31, 2011

December Wrap Up

Yes, I'm still here and finally coming up for some air now that the holidays are almost over. I've been crazy busy at work since a lot of people took time off between Christmas and New Year's. Reminder to self: be one of those people in 2012!!

I haven't been a total drone, oh no. DH and I escaped to Las Vegas last weekend for dining and a show, specifically "Jersey Boys" at the Palazzo. It's a fun musical biography of Frankie Valli and the Four Seasons. Do go see it if you can, especially if you like 1960s rock and roll. Amazingly enough, the trip was less expensive than a trip to Santa Fe--yes, including air fare. The hotels have crazy deals at Christmas--we stayed at the Mirage and the room cost $65 Friday night, and $85 Saturday. Plus resort fee of course, but that's still quite a deal!


My big splurge over the weekend was a new iPhone, purchased at the Fashion Show Mall, which has every major department store from Dillard's and Macy's to Saks, Nieman's, and Nordstrom. Amazing place. We even saw a Christmas floor show pageant, complete with Santa and his very svelte showgirl elves. Anyway, I'm all set up with the new 4S. Siri and I are trying to reach an accommodation; the girl has attitude.

And of course, I managed some sewing between the last post and this one.


Like many others, I made Shams' famous TableCloth skirt. However, I ended up making some alterations to it after its first wearing. I have hips about 3-4" below my waist and carry most of my (excess) weight there as well. So for me, the original pattern just had too much fabric in that area, and I felt very wide. I ended up taking off the waistband and making darts at each corner of the original square to eliminate some of the volume. I think it helps but I have to confess that I've had the revised version on around the house but haven't actually "worn" it yet. I hope it works out in a real wearing, as I really like the fabric and the asymmetrical hem. If I like the revised skirt and want to make another one, I'll convert the square into 4 trapezoid-like pieces rather than making darts. It's worth playing around with, and a warm-weather version would be nice to have.


I also made yet another Loes Hinse Cowl Top, finishing it up last night. I love this pattern--it goes together so quickly and is comfortable and flattering to wear in both the short and tunic lengths. This version is an acrylic blend sweater knit that I ran across at Hancock's Fabrics last fall. This is a revival of the same fabric as the vintage cardigan that I made from stashed sweater knit. It's very soft and feels very much like real wool. I think I'll wear it a lot this winter, with jeans and more dressed up clothes. I have another piece of it in the Sewing Cave, so I may make another version soon.

I'm not big on year end wrap ups for myself nor lots of resolutions. I've tried both in past years and I'm just kind of "meh" about doing it again. 2011 was a mixed year for me, but I'm hoping (as always) that 2012 will be better.

As far as sewing goes, I want to continue to make it a priority, but I think I'll lay off the sewalongs in 2012. I did garment-a-month and jacket-a-month this year and was relatively successful. I made at least one garment every month in 2011 and ended up with 8 jackets. I think challenges and sewalongs can be helpful in kickstarting sewing mojo, but they can also become production for production's sake.  I'm planning to continue to sew down my stash  in 2012, but with a few well chosen fabric acquisitions too. I want to keep sewing fun. For me, new fabric is part of my sewing enjoyment so I don't see myself stopping the acquisitions altogether.

Have a joyous and safe New Year!!  See you in 2012!

Friday, December 2, 2011

A Work In Progress and a Recent Completion

Thanks everybody--I appreciate all the lovely comments on the Fail. I got back on the horse today, so to speak, and started another garment I traced and cut out at Material Girls last Sunday.


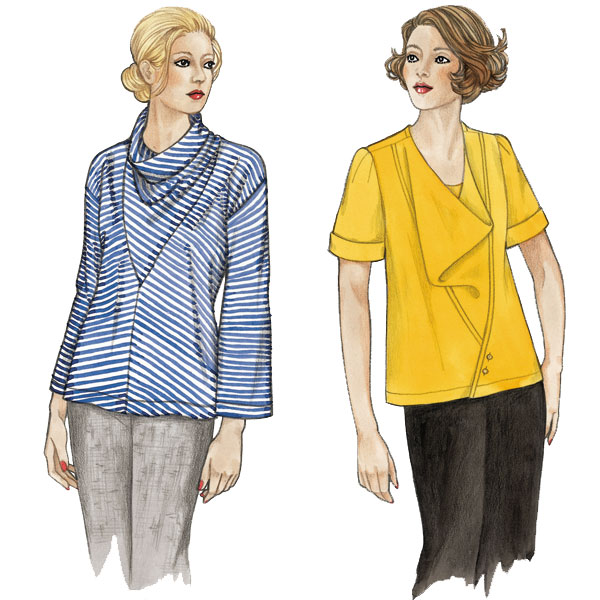
This one is another Sewing Workshop pattern called the Stella Top, the one on the left below.


I believe it's the newest of the printed patterns in this line, and it's a re-do of one of a circa 80s pattern. It's been resized and there's another cowl pattern in the envelope as well called the Luna Top, the yellow one on the right.

Another stash project because I used some stretch velvet that I've had for about a decade. The base fabric is black, then it was embellished with what appears to be gold spray paint. I got pretty far with it this morning. All that's left to do in the Sewing Cave is attach the sleeves, sew the side seams, and hem. Then I'm planning a wash in Synthrapol to (hopefully) pull off the excess dye. It's been staining my fingers as I work with the fabric but washes off easily. No crocking onto anything else, a good sign (I think). I just pinned the sides to the dress form to give some idea of what Stella looks like. So don't judge the final fit by this.


I also wanted to share a recently completed project. Yes, it's the Smudge Vest! This one I made of some white faux fur that I got for free from an ASG giveaway.

The pattern I used was Butterick 3257, circa 2001. I made View C:


This pattern is out of print, but I think it's one of those BMV patterns that returns from time to time with different envelope art, company, and number. I know there was a Vogue version of this as well.

The lining came from Gorgeous Fabrics, a really pretty poly charmeuse.


I love the colors and print; the tropical design is a perfect counterpoint to the faux fur. I couldn't get a really good picture of it even without flash, as the charmeuse is very shiny.  I used a gray zipper mostly because of the gray markings on Smudge's head; also, it just looked better than cream or white.

Sunday, October 30, 2011

In Progress: Simplicity 2154


This pattern is my latest project. I'm making the cardigan, shown in orange in the large envelope photo. I selected this because I wanted a cardigan that had features similar to a lot of ready to wear that I'm seeing right now--crew neck, straight front opening, etc. This 1960's retro pattern really fit the bill. It even calls for a grosgrain ribbon facing, which I've noticed in several recent cardigans that I've bought. And I'm also old enough to remember when that's how all cardigans were done.

In addition to that, the sleeve has a fairly high cap. It's installed in the round because side seam is drafted about 2" toward the back of the cardigan. I was going to change it but I like this detail, as it reduces some of the bulk that can happen with intersecting seams.

I'm making a test version from some sweater knit that's been aging in my stash since 2002. It's a gray cheetah print that looks great, but unfortunately, it hides most of the pattern details. It's a test run of this pattern for some nicer sweater knit that I was unwilling to sacrifice to the unknown. So far it's a success, but I still need to make buttonholes for it-eek!! I spent some time this afternoon making sample front openings to experiment with but I don't want to start on buttonholes until I'm fresh. So I probably won't finish this one until next weekend, but that's ok.

After the sweater samples, I made a few seam samples for the next project after this one, a faux fur vest that I've christened The Smudge Vest. It's another test, using a remnant I acquired through ASG. It's white and resembles my cat's coat, hence the name.

I've had some questions about the booties I wore with the TSW outfit from a couple of weeks ago. I confess, I haven't really worn them in real life since winter 2010 when I was still in banking. At that time, they were surprisingly easy to wear, probably due to the extra leather and elastic fabric on the upper combined with the insoles I put in just about every pair of footwear I own.  But all that was pre-neuroma.  I'm being reasonably cautious about going back to heels especially since I don't have to wear them at my current job. I hope I can make them work eventually--they're a lovely pair of shoes, espresso croc-embossed leather from Talbot's.

Monday, October 17, 2011

JAM 6: Loes HInse Bergman Jacket (Work in Progress)

This one is still a work in progress. Instructions for how to make this "tweak" were published in Loes Hinse's newsletter last spring when Sharon of Casual Elegance, her fabric partner, acquired some chenille. Well, I was intrigued so I bought some of each color, traced off the pattern, and even made a test garment of the blouse!

...And then it got hot, and I lost all interest in making any sort of jacket whatsoever.

Fast forward to October, still warm but with an occasional nip in the air, so I'm looking about for jackets, sweaters, vests, etc. to sew for colder weather. And the Bergman Jacket worked its way back into my consciousness.

This one is a bit of a leap of faith to make because you have to make the jacket first, then throw it in the laundry where it shrinks to a more form-fitting shape.

Loes' instructions don't call for you to make the pattern a size larger or anything either. But it just made sense to me that a jacket would need to be a little larger than a blouse (which is what the original design was), so I added some "fit insurance" to the vertical edges of the pieces when cutting out.  1/4" to each princess seam and 1/2" to the side and sleeve seams. I figured I could always trim down later if necessary.

Another change I made was to lower the neckline more than the 1 1/2" specified. The photo of the finished neckline was much lower than that, so I assumed a typo and lowered mine by 10 1/2".

And I was concerned when I tried on the completed jacket after sewing it all together but before laundering. It was dowdy, folks. But I took my leap of faith and threw it in a delicate warm water wash as directed.

And this was the result as of last evening, right after retrieving it from the washing machine:


I'm really glad for the extra circumference, because this chenille really drew up a lot  when washed! I'm thinking it will go back to the original color when dry, which is more like this:


This is the fabric as it came from the bolt. Hard to tell from the photo, but it has the slightest hint of pink-ness to it.

As of this morning, it's still a bit damp, especially around the hem. The tweak has a double hem, so there are many layers of chenille in some places.

More on this one later. I still need to make buttonholes, attach buttons and put in some shoulder pads before I can call it done.

Saturday, October 8, 2011

JAM 5: Another TSW eShrug


I've really enjoyed wearing the black eShrug I made earlier this year. It's the perfect little cover-up when traveling and has gone on several trips with me.

Incredibly, I recently found a pretty print sweater knit in Joann's bargain section. I bought it to prototype with since the wool/rayon I bought at Santa Fe Fabrics last winter was too pricy to use with an untried pattern. Well, it didn't work out that way, because I ended up using the Joann's knit for another eShrug instead.

 I'm still getting used to seeing the reverse side due to the drapey lapels, but I have a lot of purples and greens I can wear this with now that it's cooler. I've been sitting on this one since September 11, when I made it as a respite from the unending 10th anniversary coverage but it's been too hot for it until recently.

Tuesday, April 5, 2011

JAM 4: TSW eShrug Version 2

...and this one's a keeper!


After posting the first one, Terri K and Jane M suggested that fleece might not be the best choice and to try again with a different knit. Since my choices in Albuquerque are limited, I headed to another JoAnn's near Cottonwood Mall. No skull knits there, but they did have an assortment of "mohair" sweater knit in the red tag section. Most of the colors were cheap-looking, and it was obviously not from nature. However, it felt soft and there was black, so I brought some home. It's heathered, with little white fibers among the black, so white cat fur will not show! It only looks gray because I lightened the photo to show detail.

After prewashing and drying, I laid the fabric out Sunday afternoon. It was only 58" wide, just a touch too narrow for the main pattern piece. Don't you hate it when that happens? As it happened, I had read a tutorial about cutting knits crosswise earlier that day, so that's what I did. And it worked! Thanks, Marcy Tilton! The pattern piece also suggested this solution, since two grain lines were provided.

I also changed the sleeve from cap to full length. It suited the fabric and will work better for an upcoming visit to Chicago this weekend. I basically winged it by pinning the original sleeve in place, laying my TNT t-shirt sleeve over to gauge the length, then chalking the new cutting lines right onto the fabric. No pictures since I was working on black in the evening, but if you all want me to, I can work up a little tutorial. What do you think?

As before, the sewing was quick and easy, just shoulders and sleeves. I left the edges raw. Technically, this "mohair" is knitted like french terry; it has a stockinette side and a looped side. There was some shedding around the edges where loops were cut. I ran the shrug through the laundry again after completion, which has solved the problem.

Monday, March 7, 2011

JAM 3: Vogue 8430 by Marcy Tilton


I made this jacket because I had this big piece of polarfleece laying on the Sewing Cave floor, and I didn't even want to attempt to stuff it back into the fabric closet. It's another that I've had in the stash for a while, dating from 2003. It has a base of solid black fleece, but one side has sage green pine trees, stars, swirls, and dots. I'm guessing it's some sort of stencil, because the motifs have a painted texture. Regardless of how it was done, this is the only piece like this I've ever seen.


Because each side of the fleece can stand on its own, I decided to make this a reversible garment by sewing what I call a Raw Edge Flat Fell Seam. Basically, you make it like a normal flat fell seam by sewing the seam edges right sides together and trimming one edge close to the stitching. But instead of folding the wide side under and stitching it in place, I just stitched the wide side down 1/4" from the first line of stitching, then trimmed. It works because the fleece will not ravel and saves bulk on a thick fabric. I used sage thread for the second stitching. It doesn't show up as much as I'd like on the black side, but it does blend nicely on the printed side. I also used sage thread for the sleeve dart and on the zigzag stitching I added around the edge "just because."

It's a little late in the season for polarfleece, but it should be perfect for a retreat I'm taking in Northern New Mexico at the end of the month. I envision it as an extra layer I can throw on in case the lodge is chilly.

I'm not sure I mentioned it when I made the last one, but I lengthened the 2 fronts so they're the same length as the jacket back. This time, I also lengthened the sleeves by 2", short enough to leave as is but also long enough to turn up cuffs if desired. 

I wore the jacket to church on Sunday and made an interesting discovery--it glows in the dark!! That is, the sage green portions do, which makes the fabric even weirder, but that's cool. I wish I knew why it was manufactured this way, and for what purpose. At any rate, the jacket was nice for today's weather in the 50s (Fahrenheit). DH also gave it an unsolicited compliment and since he's not a Fashion guy, that means it looks good on me!

Monday, January 17, 2011

JAM 2: Vogue 8676, Sort of View A


Front


Back

This is the second time I've used this pattern, a modified version of View A for this version. The fabric I used was a double faced merino wool jersey that I bought from Fabric Mart a couple of years ago. Nice stuff, buy it if they still sell it! This piece has been washed and although it generated a ton of fluff in the dryer, there was very little fulling. I'd been searching for the right pattern for this fabric for a while because I wanted to take advantage of contrasting colors of both sides.

Marcy Tilton's notes on the pattern guide sheet recommended using the plain (View B) collar if the fabric doesn't roll when cut. The jersey I used has very little roll, so I took her suggestion. I also changed the sleeve and cuff to View B because I had a short cut (the pattern calls for 2 fabrics for View A), and I was afraid I wouldn't have enough to cut all the little strips cross grain as directed. I also substituted buttons for the fabric "buttons" of the pattern--just a little too-too for me.

Threads published a tutorial by Kenneth King  on its website last week which was very timely, since he discussed using a rotary cutter with a pinking blade to finish exposed seams on a sweater knit. I decided to do the same thing on this jacket, as you'll see in the detail shots below:


 Sleeve and cuff--per the pattern instructions, the cuff's lower edge was cut on the selvedge, then joined to the sleeve by lapping the raw edges. I reversed the cuff to show the contrasting black side.


Collar and shoulder seam--per the pattern instructions, the collar has raw edges and was attached to the jacket with a lapped seam. I added the pinked edges. I changed the sewing of the shoulder seam to show the black, pinked reverse of the fabric.

One of the most striking features of this view is the use of circular motifs, a perfect way to take advantage of the fabric. They were sewn to the jacket by edgestitching the raw edges of the motifs. The accent lines are raw edged cross grain strips that I pinked before sewing down.


Pocket detail


Back detail

Both jackets were really fun to make due to the unusual sewing techniques used. The jacket itself is a fairly basic shape that's flattering to wear, so I'll hang onto this pattern. It will be easy to modify further--maybe next time, I'll make it with traditional sewing techniques!

Saturday, January 15, 2011

Owww

I had plans to pose for pictures in the Marcy Tilton jackets today, but umm, change of plans. DH and I were using the tripod to take a self portrait with our cars (long story), and when we were done, I somehow tripped and took a face plant onto the pavement! I have scrapes on my nose, cheekbone, forehead and hands. Thankfully, no serious damage!!

Needless to say, I'd rather heal up a little! So I'll take some pictures of the new coat on Ms. Acme over the weekend. It came out really cute.

Monday, January 10, 2011

JAM 1, Vogue 8676, View B--Complete!

 
I put the finishing touches on this jacket today, so I thought I'd share some quick photos. Rest assured, I'll be modeling it in a future blog post so you can see what it looks like on a person. However, it turned darn cold here in New Mexico overnight, so I was in no mood for modeling today. 
If I do say so myself, I did an awesome job of pattern matching across the front. You can barely see the center opening. The pattern called for functioning buttons and buttonholes, but I didn't want to take that on, especially with a bulky collar right above the first one. Which is not to say you can't sew buttonholes in fleece--I've done it before, just chose not to this time. So there are large snaps underneath the buttons. I also added a fourth closure to the front. The pattern only specifies 3, with the last one hitting at waist level. Really? That doesn't make much sense to me. 
Like most of Marcy Tilton's designs, this one features some atypical sewing techniques. For example, the cuffs feature the raw selvedges of the fabric. The sleeve overlaps a portion of the cuff piece, then both sides of the overlap are edgestitched together.
 
The pattern instructions specify a raw edge for the sleeve edge.  I don't particularly like the raw edges of fleece, so I finished it off with 3 thread serging. 
I also used 3 thread serging to finish off the collar. The instructions tell you to spray baste the 2 collar pieces together, then stitch 1/2" from the edges all the way around. Again, I don't like those raw fleece edges.
 
 
Once the collar is assembled, its edges are lapped over the neck seam, then you sew a line of stitching 1/2" from the lower collar edge. 

Even though it's another black garment, I agree with sdBev-JoplinJacket, who commented:
 
grey and black are the colors we use when projecting sophistication or a certain sexy something. Enjoy your greys. They can say more about you. 

It does look sophisticated, and even kind of cheerful with the art nouveau poppies.

I did enjoy making this pattern, enough that I pulled out another piece of the double faced wool jersey that I used for these projects last winter. The piece I'll use for that version is turquoise aqua and black.

Friday, January 7, 2011

Vogue 8676, View B, Marcy Tilton Jacket

I finally got started on my first jacket for the Jacket a Month Sewalong on Stitcher's Guild.  I'm working on View B, which is the one without the circular motifs.


As it happened, I had a piece of polar fleece that I've been saving for quite a while (2003!), and it's perfect for the pattern. It's a floral, like on the pattern envelope, but neutral colors of black, gray and cream. It seems like I'm sewing and wearing a lot from that color palette lately--probably reflects my mood these days. Hmm.

Like many of Marcy's patterns, the sewing techniques are "different"--lapped seams, raw edges and exposed selvedges. While remaining true to the spirit of the jacket, I've finished it off a little bit more than she specifies, basically because I don't think raw edges on fleece are all that attractive. However, the jacket is easy sewing. Between last night and a little time this morning, it's almost done.