Saturday, February 25, 2017
Loes Hines V Neck Tunic View B
This one is an experiment that turned out ok. I was looking for a new knit top pattern and found this one among my Loes Hinse collection. With a center front, center back, and 2-piece raglan sleeves, the pattern offers lots of fitting opportunities.
The fabric is an old Emma One Sock stretch velvet that's been in the stash for a time.
In spite of the rolling edges that are typical of stretch velvet, it wasn't hard to sew and turned out well. I used a combination of Medium and Large sizes which is my usual. I'll be making more from this pattern in the future! I think it would adapt to many types of knit fabric.
Like many of the Loes Hinse patterns, this design is a classic that has stood the test of time.
Monday, February 20, 2017
Vogue 7806 Jacket, View C
I've had this on on my to-do list for quite a while and finally decided to bite the bullet. The fabric is a faux leather and shearling from Fabric Mart and the pattern is OOP Vogue 7806.
View C of this pattern is designed for faux shearling, but I ended up making several changes from the pattern instructions to give the jacket a more finished look. The pattern calls for a lot of raw edges, which look just that--raw and unfinished. I made shearling binding from extra fabric, which I sewed to the edges, wrapped around to the back side, then stitched in the ditch to fasten the binding on the reverse. Once sewn in place, I trimmed off the excess fabric on the back. Where going around curves, I had to slash the binding since it didn't have any "give" and later hand stitched the raw edges together. This is the finish that you can see around the pockets and around the perimeter of the jacket.
There is also a machine sewn buttonhole on the jacket, thanks to my Bernina 710. It was able to go through 2 layers of the faux shearling with no worries. Here's a detail of the buttonhole, which also provides a nice look at the texture of the faux leather side.
The faux shearling wasn't too difficult to work with although it was heavy and shed fuzzies all over the place. I was also wary about pressing so I catch stitched all the seams in place by hand. Since I'm not much of a hand stitching expert, I relied on my mid-seventies edition of the Vogue Sewing Book for advice:
Those old sewing books do come in handy and this one is a keeper!
Sunday, January 8, 2017
Instant Pot "Cooking Without Recipes" Soup
I promise you this blog is not going to become an Instant Pot blog! But I am having a lot of fun with it. This soup is based on a sort-of recipe I found on bonappetit.com, the web site of Bon Appetit magazine. It's part of their series called "Cooking Without Recipes." I basically used some things I wanted to use up in my fridge and pantry to put this soup together.
2 tablespoons (more or less) of olive oil
1 pound package of turkey breakfast sausage
1 onion, chopped
4 garlic cloves, chopped
1 teaspoon chili flakes
1 teaspoon fennel seeds
1 teaspoon of Worcestershire sauce
1 quart beef broth, store bought
1 28 ounce can of tomatoes
1 pound chopped collard greens (part of a pre-chopped bag I bought for New Year)
1/2 pound dried chick peas, soaked
1/2 teaspoon dried basil
1/2 teaspoon dried oregano
3 bay leaves
Heat oil using the saute function of the Instant Pot. Brown sausage, breaking it into pieces. When it’s cooked through and there’s good caramelization on the pieces, remove the sausage with a slotted spoon and transfer to a bowl.
Add the onions and garlic to the Instant Pot and saute for about 8 to 10 minutes until softened and beginning to brown. Then stir in the Worcestershire, fennel seed, and red pepper flakes.
Add the beef broth and scrape up any browned bits from the bottom of the pot. Add tomatoes and juice and stir to combine. Add collard greens, drained chick peas, basil, oregano, and sausage. If the soup looks too thick, add some water. I think I ended up adding a tomato can's worth. Stir to combine all ingredients, turn off the saute function, and lock down the lid. Set the Instant Pot to manual at high pressure for 20 minutes. Use a natural pressure release (at least 15 minutes) before opening the Instant Pot and having your soup!
Saturday, January 7, 2017
Instant Pot Black Eyed Peas
This dish was my New Year's day dinner. Where I grew up in Kentucky, you ate black eyed peas and collard greens for luck in the New Year. I'm a little late in posting this, but black eyed peas are delicious and healthy. You can eat them anytime! I have packaged up and frozen several servings for reheating for workplace lunches.
My version is based on a recipe from a Tabasco sauce brochure I've had since I lived in Mobile, Alabama in the 1980's.
All of the recipes in the brochure were written by the late New Orleans chef Paul Prudhomme. Although it was available for a minimal price, it's a great little cookbook with stories and pictures of Cajun life "back in the day."
Now that I have the Instant Pot, I've been making a lot more dishes with dried legumes. Before, preparing them was an all day challenge. since Albuquerque is a mile high city, it took forever to cook beans soft enough to eat. It was easier after I acquired a stovetop pressure cooker, but using it still required a lot of watching, and the thing was a pain to clean. With the Instant Pot, it's faster and easier, so I've been adapting some of my old recipes.
The original recipe includes chicken fried and smothered with black eyed peas and served with rice. It's good, but rich! So I decided to focus on the black eyed peas instead of making the entire recipe, which is quite a production between frying up a chicken and simmering peas on the stove.
Here's my adapted version:
1/4 cup (approximate) olive oil
4-5 slices of bacon, cut into 1/2" pieces
2 - 2 1/2 cups finely chopped onion
1 1/2 - 2 cups finely chopped celery
3 bay leaves
1 tablespoon plus 1 teaspoon Tabasco sauce
1 pound dried black eyed peas (soak overnight and drain)
1 tablespoon garlic powder
1 1/2 teaspoon rubbed sage
1 teaspoon onion powder
1 teaspoon dried thyme
1/2 teaspoon white pepper
1/2 teaspoon dry mustard
1 quart chicken broth
water
Using saute function (medium), heat oil in the Instant Pot. Add the bacon and cook until it starts to become crisp, about 3-4 minutes, stirring often. Stir in the onion, celery, bay leaves, and 1 teaspoon of Tabasco; cook until vegetables start to get tender, about 3-5 minutes, stirring frequently. Add the peas, garlic powder, sage, onion powder, thyme, pepper, and mustard; stir well. Cook until all the oil and juice is absorbed and the mixture starts sticking, about 2-4 minutes. Add the stock and remaining 1 tablespoon of Tabasco. If needed, add additional water if needed to cover mixture about an inch.
Reset the Instant Pot to Manual and 7 minutes, then lock down the lid to pressure cook the peas. Once the cycle is complete, natural pressure release for 15 minutes and open. If the mixture is too watery, set the Instant Pot to saute and boil off the excess liquid until the the peas and sauce are the desired thickness. I'd describe the texture as saucy but not soupy. I hope that makes sense.
Serve the peas over hot cooked rice. The original recipe used white rice, but I used brown rice that I had previously made in the Instant Pot using the instructions in the manual.
Yes, it does sound like a lot of spice, but it's flavorful, not spicy-hot. This could easily be made vegetarian by omitting the bacon. You do need the oil in order to saute the onion and celery, so don't skip that.
I found the pressure cooking timetables in Hip Pressure Cooking by Laura D. A. Pazzaglia to be helpful for determining the cooking time for the black eyed peas. She also has a good section about soaking beans. So far, I haven't followed any of her recipes exactly but have used them as guidelines to adapt my own recipes.
I also served the peas and rice with some collard greens. This was not a recipe per se, although I figured out how to make it in the Instant Pot by adapting the recipe "Collard or Dandelion Greens with Slab Bacon, Pecans, and Malt Vinegar" from Pressure Cooker Gourmet by Victoria Wise.
Here's my version:
2 tablespoons olive oil
1 clove of garlic, minced
1-2 pounds of collard greens, chopped and large ribs removed (mine was pre bagged and chopped)
3 tablespoons balsamic vinegar
3/4 cup water
Freshly ground black pepper
Using saute function (medium), heat oil in the Instant Pot and saute the garlic. Making sure the collard greens are dry, add them to the Instant Pot and stir. They will wilt down. Combine vinegar and water and add to the greens. Reset the Instant Pot to manual and 5-7 minutes, then lock down the lid to pressure cook the greens. Once the cycle is complete, natural pressure release for 5 minutes and serve.
Sunday, January 1, 2017
Back From My Blog Hiatus!
Well, this is embarrassing. "Summer Wrap Up" is my last post and I put it up on September 15.
I guess I could say that I needed a break but in reality, life took a bit of a turn this fall. Work became extremely busy this fall, between a reorganization of our department in May, summer vacations, and the work partner for one of my clients leaving the company unexpectedly. Lots of overtime and stress to deal with, so that affected my sewing time--actually my personal time in general.
On a lighter note, my workplace switched to a jeans everyday dress code, and that's had an impact on my wardrobe and my sewing. That seems like a good thing, right? However, my wardrobe needs changed quite a bit and it's taken a while to come to terms with that. I'm starting to move forward with sewing again and have decided to focus on shirts, jackets, sweaters, and tops. I can buy jeans that fit and don't have much desire to make them. I've only made a couple of projects since September but I'm looking forward to coming up with some new projects now that I've identified my wardrobe needs.
I'll be working on self-care this year since that's taken a back seat for the last several months. I need to take time for myself and things that are important to me because I'm feeling a bit frayed around the edges, if you know what I mean.
I'm happy that I bought an Instant Pot during Amazon Prime Week! (Thanks, shams!) I've been experimenting with it quite a bit and having creative fun converting recipes and making new ones. I'm even taking lunches to work instead of eating at the cafeteria, definitely a good thing! We bought a new stove too, but I confess that I haven't used it a bit since it was delivered.
DH and I will be starting back with morning walks now that the holidays are over, and I'll also be signing up at the neighborhood gym. I tried going to the gym at the office. It worked for a while, but I think something closer to home would be better. Plus weekends!
Like many of you, I'm glad 2016 is over, and I'm looking forward to a better 2017 in spite of the uncertain times we're in! I'm hoping that some personal re-tooling will go a long way toward that goal!
Thursday, September 15, 2016
Summer Wrap Up
I had meant to post pictures of garments on me before now, but between work (busy) and monsoon (afternoon storms), it's been difficult to set up a time. Oh yeah, and my remote gave out and I had to order another one from Amazon.
But I finally got around to it so here's an assortment of summer garments, right in time for the fall. It's still warm, so these will be wearable but I'm starting to lean more towards fall shades. So we'll see if they actually get any wear for a while, even as layering pieces.
If you want to see more details, click on the links.
Cutting Line Designs, Pure and Simple Shell:
Sewing Workshop, Eureka Top:
Butterick 6324, View A:
Cutting Line Designs, Simplify Your Life, View B:
Monday, September 12, 2016
Another Kwik Sew 2565 Quartet
Yes, more of them. But a basic T shirt is pretty versatile and they make great layering pieces. I finished this group up yesterday after a marathon session of coverstitching.
This time, I was able to get some picture of me wearing them, with various levels of success. But then, I never claimed to be a professional model or photographer!
This one was made from a remnant I had left over from another T I made several years ago when I first got the pattern. The original is long gone, but I had just enough for another version. The fabric came from Emma One Sock and is a cotton and lycra blend.
The fabric for this one came from Gorgeous Fabrics and is a very soft rayon. I think this one may end up as a layering piece. Although rayon is nice to work with and very comfortable to wear, it tends to be clingy.
Another fabric from Gorgeous Fabrics. This one is a poly matte jersey. The color in real life is darker, what I'd refer to as an American Beauty Rose shade.
This fabric is from Jo-Ann's. It's a bit thin, so will be another layering piece, but I really loved the print.
I think I've located a current Kwik Sew pattern that's pretty similar to my TNT 2565. I haven't sewn it yet but it may be worth trying.
Saturday, August 13, 2016
Cutting Line Designs, Pure and Simple Shell
This is one of those patterns that I often turn to when I need a simple top for warm weather (which is often here in Albuquerque). I currently have a couple of versions in rotation in my closet and I've made several others in past years.
This one came about when I was at my local JoAnn's picking up some thread for another project. Lately, thread has been a challenge. Although I have a whole drawer full, I never seem to have the color I need for a given garment (and recently, even ran out of white!). On my way to the thread, I noticed that the linen was on sale and a couple pieces of "tissue linen" (actually a linen and cotton blend) jumped into my cart. One of them was the bolt end of slightly less than 1 1/2 yards that became this top.
It was a pretty easy sew since I've made it several times before, so not much to say about construction except that Cutting Line's guide sheets are incredibly detailed, even for a simple top like this one. Unfortunately this pattern is out of print, but Louise Cutting has mentioned she may bring out something similar in the future.
I'll try to get a picture of this on me in the near future since the dress form really doesn't do it justice.
Tuesday, August 9, 2016
Cutting Line Designs, Simplify Your Life View B
This pattern has been out for a while, but it was a new one for me. I've been needing some simple garments for work since we're in jeans mode all summer long. Plus, Albuquerque is hot this time of year! Garments need to be light and airy for being outside in the heat, while also being layering pieces for air conditioning.
The top is fairly simple looking but the button band across the left shoulder and sleeve gives it that little something extra.
I love these shell buttons that came from Hancock's when they were going out of business.
I got the fabric at the ASG conference in San Diego last year; one of the vendors sold fabric that was literally in piles and you had to dig to find the fabric you wanted. I'm not sure of the fabric content but it's a voile. I originally thought it was poly but after sewing with it, I think it's a cotton/poly blend or maybe even cotton.
I barely had enough fabric, so had to be a bit creative in cutting. I would have preferred to have the flowers centered on both front and back, but there just wasn't enough. I think it's all right though.
As is typical for Cutting Line, the pattern has simple lines but is well-drafted with very detailed guide sheets. Also keep in mind that the designer, Louise Cutting, often does not have you assemble the garment in the order that you'd use for the typical Butterick/McCall/Vogue pattern.
Related to that, I found one little error in this pattern--if you follow the order of construction as written, you will make all of the buttonholes and attach all buttons before completing the side seams and sleeve hems. However, the sleeve hem is very close the the last buttonhole and button, so hold off on sewing them until after the sleeve is hemmed.
Saturday, August 6, 2016
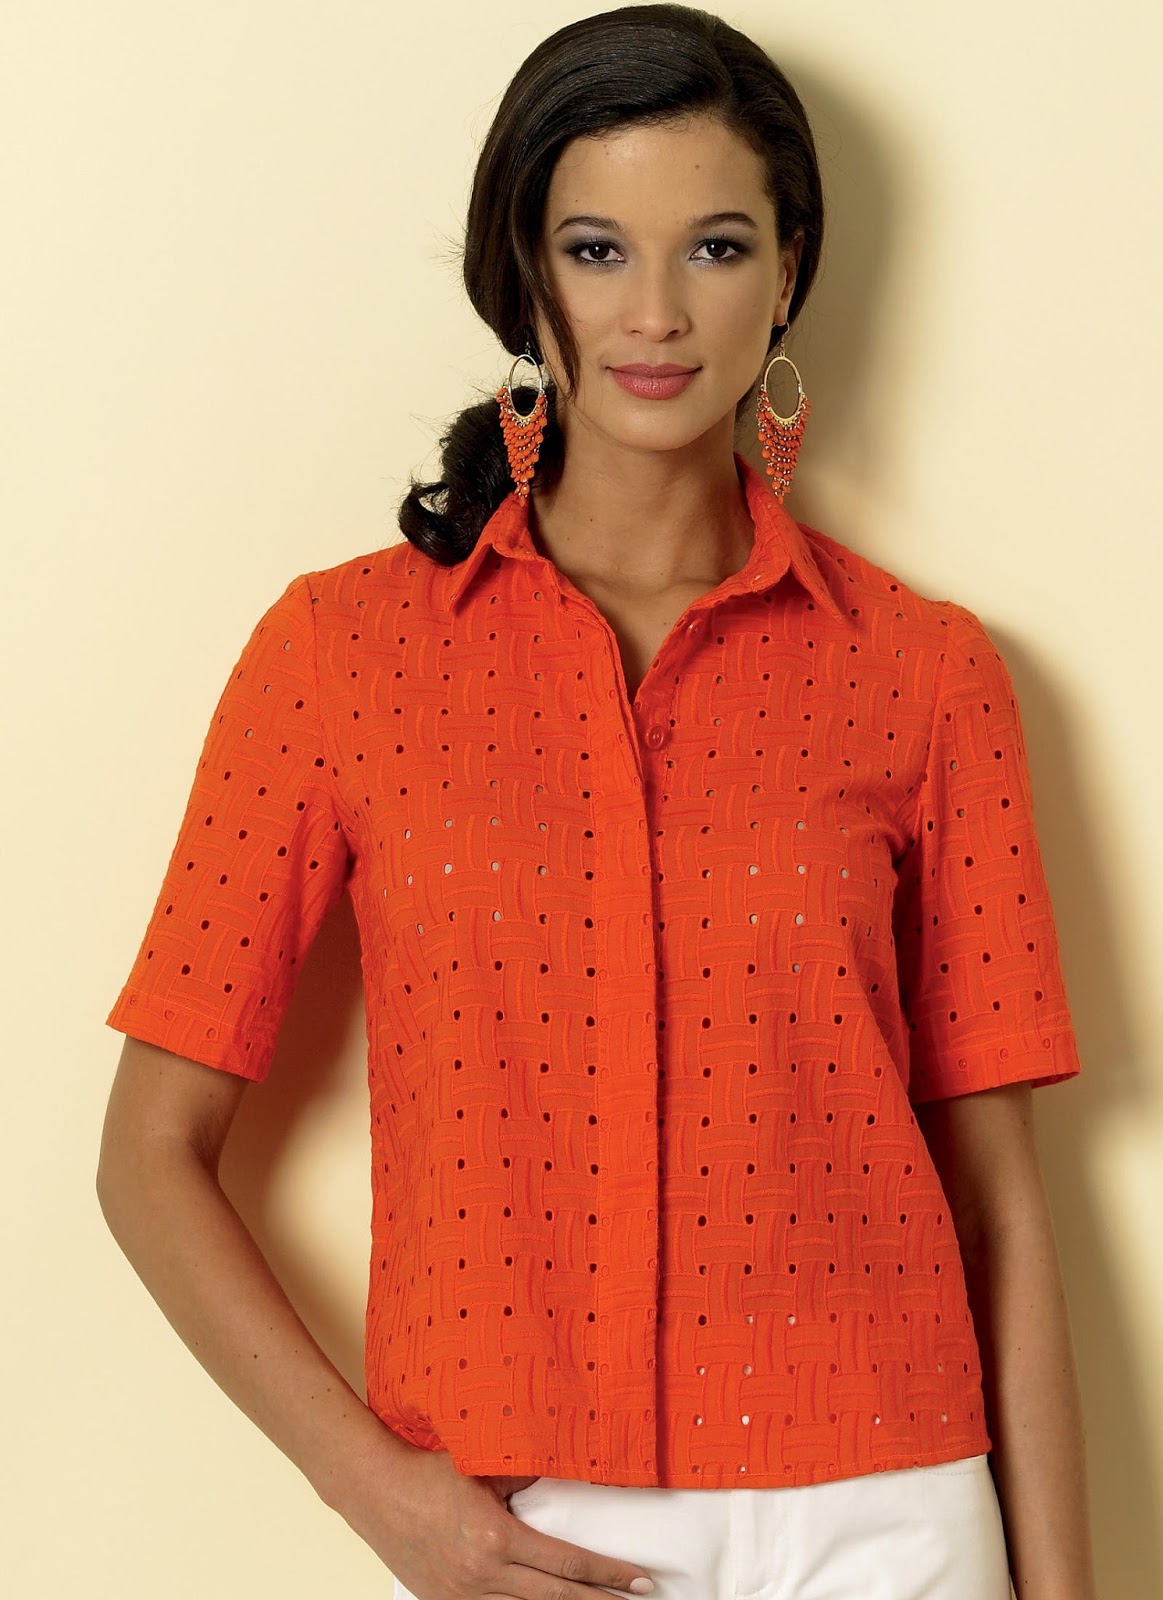
Butterick 6324 View A Top
I bought this pattern because I was intrigued by the photo of the orange eyelet top on the envelope.
I'd also been looking for a shirt style without facings that I could use with sheers and eyelets. And that hidden button placket was so cool!
I traced off the View A pieces since the pattern tissue combined multiple views as single pieces on the tissue (grrrr...). And then it sat.
Why? Because the hidden button placket consisted of several separate pieces seamed together. Holy bulk, Batman! So, I re-drew the placket and band so they would be part of each of the pattern fronts. A bit of a brain teaser but I eventually worked it out. Less bulk, many fewer seams, and much easier to match patterns across the front of the garment. Below is a photo showing off the placket and collar:
You can see that the fabric is "ventilated", with the stripes woven with openwork. The pattern also features a collar with stand, which went together nicely.
Another change I made to add to the pattern was to provide some additional room in the hip area. Although the envelope went up to a 14, I needed a bit more room. :( I used one of Louise Cutting's "Industry Insider Techniques" videos to add another 4 inches. The technique I used is in Volume 6. The DVDs are produced by Threads Magazine and have been very helpful to me. In my experience, many sewing techniques are easier to view than read.
The fabric is a novelty weave cotton print from JoAnn's, of all places! I was very pleased with how it handled during construction. Every one in a while, even they get it right. Of course they don't have anything like it in their stores now, but maybe they could bring it back...perhaps in some solid colors?
Overall, I liked how my test garment came out and I'll be wearing it a lot and making more like this. I'm also planning to tackle a couple of the other views too. View B has a contrast hidden placket that could be fun to play with. View C features lace overlays and back, which would work well with some sheer remnants I've acquired. View D's illustration looks very blah, but could become a nice basic without overlays, or more special with them.
Wednesday, August 3, 2016
TSW Eureka
Slinky has fallen out of style, but I had a piece of it in a nice blue color that I really loved. I was tired of passing it by every time I made a knit garment, so I needed to find a pattern. Oh, and it was also short yardage, which meant that I had to find something that didn't use very much fabric.
Eureka Top to the rescue! Its simple shape and loose fit worked well with the Slinky and didn't take much time to make. The cutting probably took longer than the sewing. I changed the neckline so that the technique used is more like my TNT Kwiksew 2565. And I didn't tack up the cuffs, two layers of Slinky is enough, and almost too much. So, more like sleeves than cuffs. You'll notice in the photo below that I edge stitched the sleeve seam. Doing so helped flatten the seam which is thick with three layers of fabric (two for the sleeve and one for the garment).
Here's the drawing from the pattern envelope. Eureka is actually a twofer, with a skirt in addition to the top. I've also made the skirt a couple of times. It's fun to sew and wear, albeit a fabric hog.
Sunday, July 31, 2016
Another TSW Liberty Shirt
I've made this shirt several times and have been meaning to give it a rest, but work has intervened. We've been having "Red on Fridays" in honor of a coworker who's currently on assignment with the NM National Guard overseas, so I've been supplementing my work wardrobe with red garments.
I bought the red ikat cotton from Ann Silva's several years ago. She mostly sells quilting fabrics, but once in a while she gets other things like this! It was a joy to work with although the color was a bit tricky, since it's a cross weave. I auditioned several colors of thread and ended up using a Coats thread called "Tomato Bisque." The buttons were another surprise. I tried several different red buttons but these odd pink-ish ones looked the best with the fabric. I guess it goes to show that you have to look at the blend instead of individual threads when determining what will work best.
Once again, I used the collar I drafted instead of the one that came with the pattern. Just my preference. As with the other versions I've made, this one went together easily.
I really like the Sewing Workshop pattern line. I like most of the releases and they have excellent instructions.
Once again, I used the collar I drafted instead of the one that came with the pattern. Just my preference. As with the other versions I've made, this one went together easily.
I really like the Sewing Workshop pattern line. I like most of the releases and they have excellent instructions.
Sunday, July 10, 2016
Tank from the Loes Hinse Tank Dress Group Pattern
Another remnant project. I used this fabric last year for a project that didn't work out and had just enough to sew this tank. The fabric is another Textile Studios purchase--a woven rayon with some texture.
I have made this pattern several times before in both dress and tank versions.
However, I wanted the back to have a little bit more coverage so I don't always need to wear racer back underpinnings. My test worked so it's onward with other versions of this pattern!
The SewWest Closet: old black jeans from Ross, the Foster Grants, and Th!nk Birkenstock-style sandals (also old but I'll hate to give these up when they're worn out).
Wednesday, July 6, 2016
New Look 6892
OMG, I'm loving this peasant blouse! I've been looking for a peasant blouse pattern since they're on-trend right now. This pattern came together very easily and features multiple views for a variety of looks.
This one was kind of an experiment, so I used some rayon that I bought as a remnant from Denver Fabrics. It has a rumpled texture, so is perfect for warm weather.
The pattern uses bias tape for the casings but I just serged the raw edges to finish, turned under, and stitched the casings just wide enough for the 1/4" elastic to go through. Faster and much less bulk to worry about. For the cuffs, I used some lace seam binding left over from another project. I liked the ruffly cuffs but may change to a simple casing for the next long sleeved version as they are not terribly practical.
The SewWest Closet: the black jeans are old from Ross and the platforms are by Vigotti. Foster Grants again!
Saturday, July 2, 2016
Textile Studio Basic Top
I've been fooling around with this pattern and have already posted 3/4 sleeve and long sleeve versions. But it's summer--short sleeves come in very handy in the heat and as layering pieces.
For this round, I've been working on adjustments to eliminate shoulder pad ease. I think I've just about got it, although I'd like the sleeve cap to be higher on my shoulder. So that's the next round of adjustments.
Because I'm experimenting, I used a remnant of Kaffe Fassett rayon from Fabric.com that was left over from this Simplicity 2416 skirt that I made several years ago. I haven't been able to locate any more Kaffe rayons since then, only cottons. Since the top was a success, I now have coordinates that work together as a dress (with the addition of a sash that I also made from remnants), or with other garments.
FYI, that circle on the left front is actually lower in real life than it appears in the picture! :)
I'll definitely be playing with this pattern some more in the future since it's a quick make and a wardrobe builder.
The SewWest Closet: the shoes are B.O.C. by Born. Sunglasses by Foster Grant?
Sunday, June 19, 2016
A Quartet of T-Shirts
I hesitated to even post these because you've seen a ton of Kwik Sew 2565 T-Shirts on this blog. But I live in Ts, and I've been remiss in posting again, so here are the latest from my TNT pattern of all time.
The first three are from the now-defunct Textile Studios. I can't swear to it, but I know I bought several fabrics from there when they were going out of business.
The first one is made of a double layered synthetic that has dimensional flowers cut from the top layer that are tacked down to a base for a tattered effect.I'm still in the process of doing some additional tacking on the machine just in case. The neckband is a mystery knit that I found in the stash. It's kind of a swimsuit type of knit but I'm really not sure where it came from.
The next two are ITY knits and were easy to work with.
The first three are from the now-defunct Textile Studios. I can't swear to it, but I know I bought several fabrics from there when they were going out of business.
The first one is made of a double layered synthetic that has dimensional flowers cut from the top layer that are tacked down to a base for a tattered effect.I'm still in the process of doing some additional tacking on the machine just in case. The neckband is a mystery knit that I found in the stash. It's kind of a swimsuit type of knit but I'm really not sure where it came from.
The fabric from this one came from either JoAnn's or Hancock's some years ago. It's knit in a subtle Asian design as well as having the print. Long sleeves work well at the office even though it's very hot here. The air conditioning indoors can be quite cold! We're wearing red on Fridays to support a co-worker who's overseas with the National Guard, so that's another reason I used this fabric.
I have three more short sleeved T-shirts cut out and ready to be made from this pattern; all are solids that came from Gorgeous Fabrics. They go together quickly, so it's good to have them ready if the urge to sew hits.
And here's another picture of the pattern that I used. It's long discontinued but a classic look.
Friday, April 22, 2016
Oscar de la Renta at the deYoung, Part 4
Are you still with me? It wouldn't be Oscar de la Renta without ball gowns and red carpet.
Some closer looks...
Thanks for your indulgence in looking at all these fabulous garments. I just loved the show and had to share it with you!
The final gallery featured gowns that had been worn by celebrities. From left to right: Karlie Kloss, Taylor Swift, Sarah Jessica Parker, Jessica Chastain, Amy Adams, Penelope Cruz, and Nicki Minaj.
Some closer looks...
Thanks for your indulgence in looking at all these fabulous garments. I just loved the show and had to share it with you!
Subscribe to:
Posts (Atom)